from multiprocessing import Process import time,os
deffun(name): print("Run child process is %s(%s)" % (name, os.getpid())) print("hello", name)
if __name__ == "__main__": print("Parent Process %s" % os.getpid()) p = Process(target=fun, args=("xyq",)) print("Child process will strat.") p.start() p.join() print("Parent finish!")
import multiprocessing from multiprocessing import Process import time,os
deffun(name): print("Run child process is %s(%s)" % (name, os.getpid()))
if __name__ == "__main__": print("Parent Process %s" % os.getpid()) for i inrange(8): p = Process(target=fun, args=(i+1,)) p.start() for p in multiprocessing.active_children(): print("child process name is :"+p.name+"chile ID is :"+str(p.pid)) print("waiting all Child process finish")
for p in multiprocessing.active_children(): p.join()
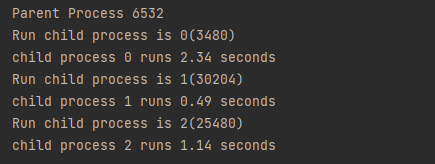
import multiprocessing from multiprocessing import Pool import time,os,random
deffun(name): print("Run child process is %s(%s)" % (name, os.getpid())) start = time.time() time.sleep(random.random()*3) end = time.time() print("child process %s runs %.2f seconds"%(name, (end-start)))
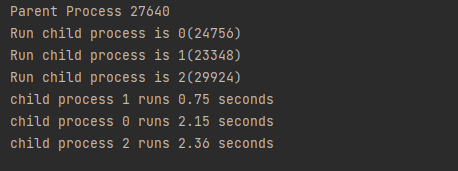
if __name__ == "__main__": print("Parent Process %s" % os.getpid()) p = Pool(3) for i inrange(3): # 异步非阻塞式,根据系统调度进行进程的切换 p.apply_async(fun, args=(i, ))
# 在调用join时需要先关闭进程池 p.close()
# 等待全部子进程执行完毕后 p.join()
结果:
如果使用p.apply采取阻塞方法,会使进程依次执行,看结果:
也可以使用with方法进行进程池的创建:
1 2 3 4 5 6 7 8 9 10 11 12 13 14 15 16 17 18
import multiprocessing from multiprocessing import Pool import time,os,random
deffun(name): myname = 0 for i inrange(name): print("(%s)process is running:%d"%(os.getpid(), i)) myname+=1 return myname
if __name__ == "__main__": print("Parent Process %s" % os.getpid()) with Pool(3) as p: result = p.map(fun, (3, 6, 9)) for item in result: print(item)
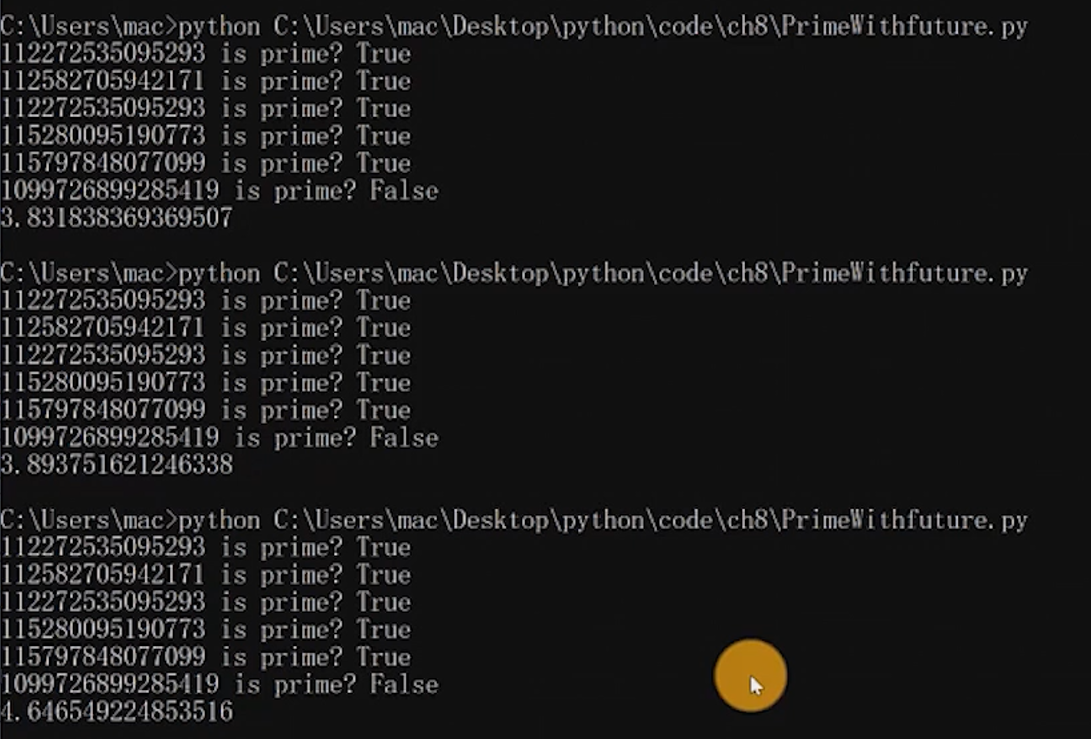
import concurrent.futures import math from time import time
defis_prime(n): if n<2: returnFalse if n==2: returnTrue if n%2 == 0: returnFalse sqrt_n = int(math.floor(math.sqrt(n))) for i inrange(3, sqrt_n+1, 2): if n%i ==0: returnFalse returnTrue
defmain(): with concurrent.futures.ProcessPoolExecutor() as pool: # 提交给pool的是一个函数,如果是map,提交方法为pool.map for number, prime inzip(PRIMES, pool.map(is_prime, PRIMES)): print("%d is prime?%s"%(number, prime))
if __name__ == "__main__": start = time() main() end = time() print(end-start)
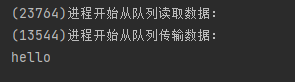
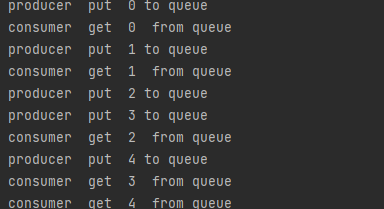
import os from multiprocessing import Process,Queue import time
counter = 0 defwrite(q): print("(%s)进程开始从队列传输数据:"%os.getpid()) for i in ['a','b','c']: q.put(i) time.sleep(0.2) defread(q): print("(%s)进程开始从队列读取数据:"%os.getpid()) whileTrue: i = q.get(True) print("Get %s from queue"%i)
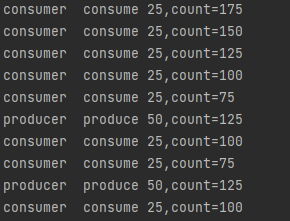
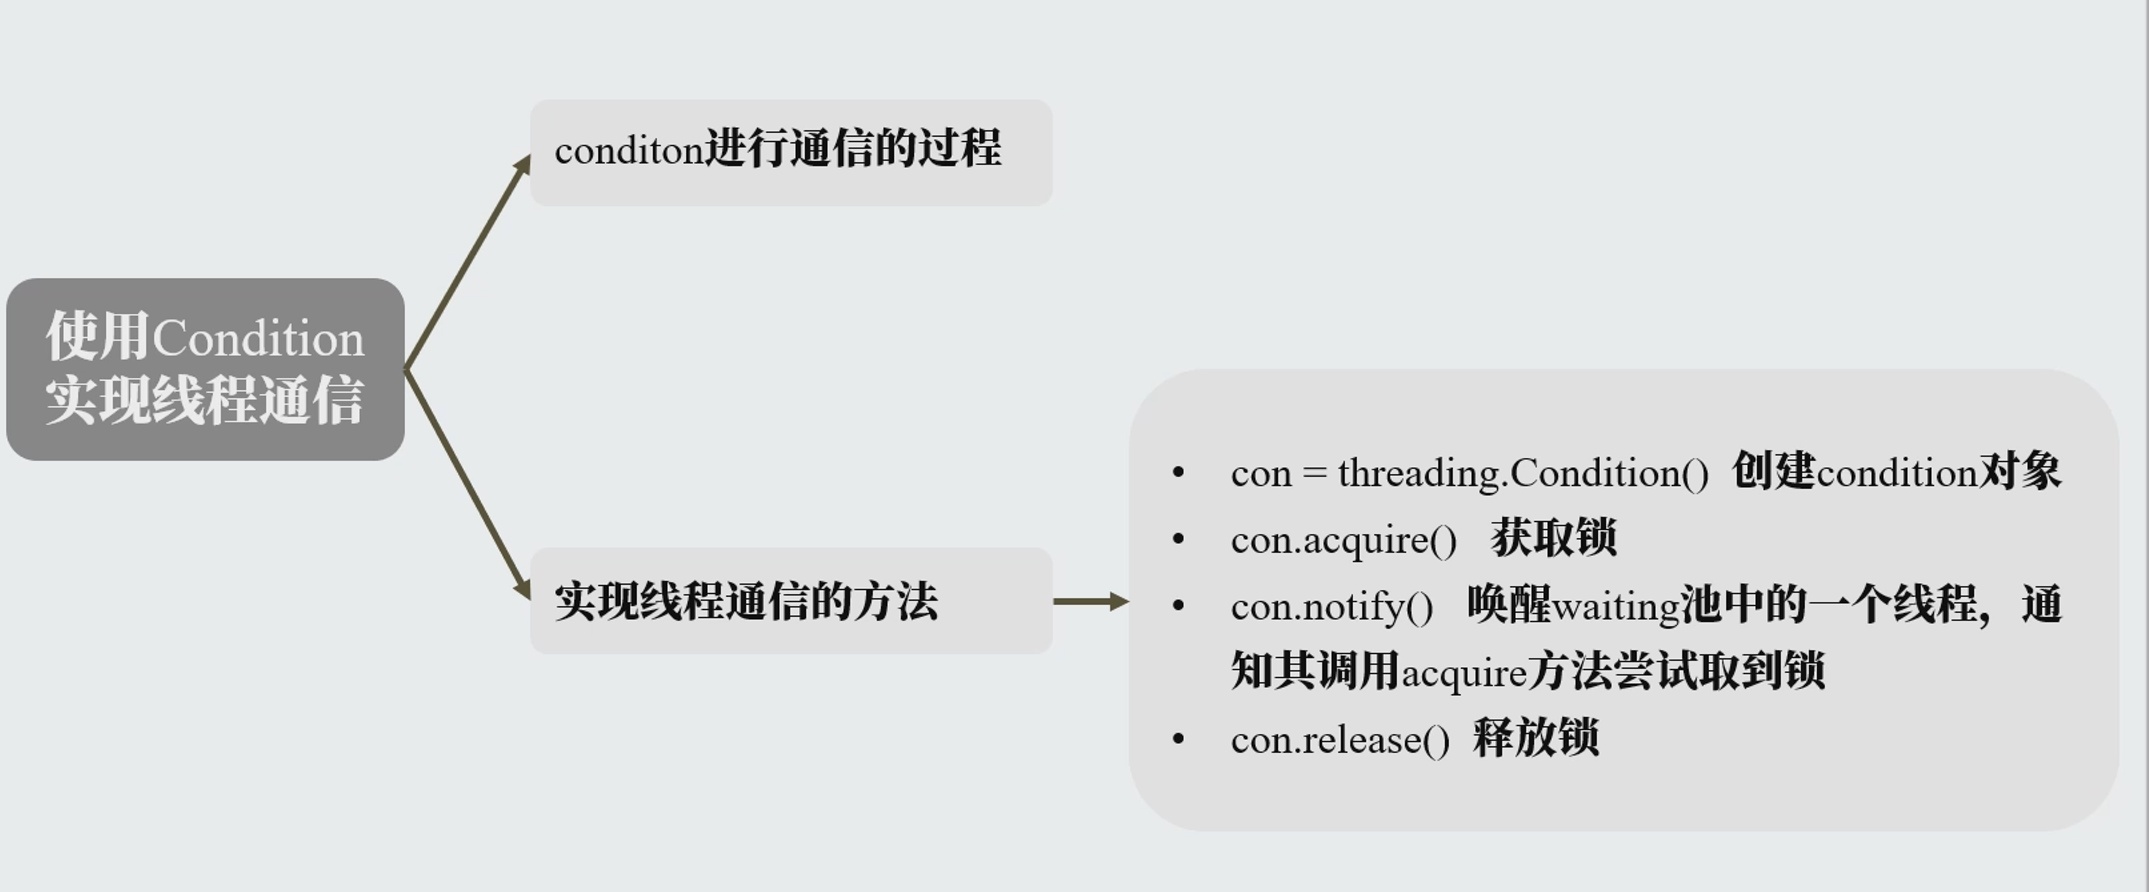
defrun(self): global count whileTrue: with con: if count < 100: con.wait() else: count -= 25 print(self.name + 'consumer 25,count=' + str(count)) con.notify()
count=200 con = threading.Condition()# 创建condition对象 deftest(): for i inrange(2): p = Producer("producer") p.start() for i inrange(3): c = Consumer("consumer") c.start()
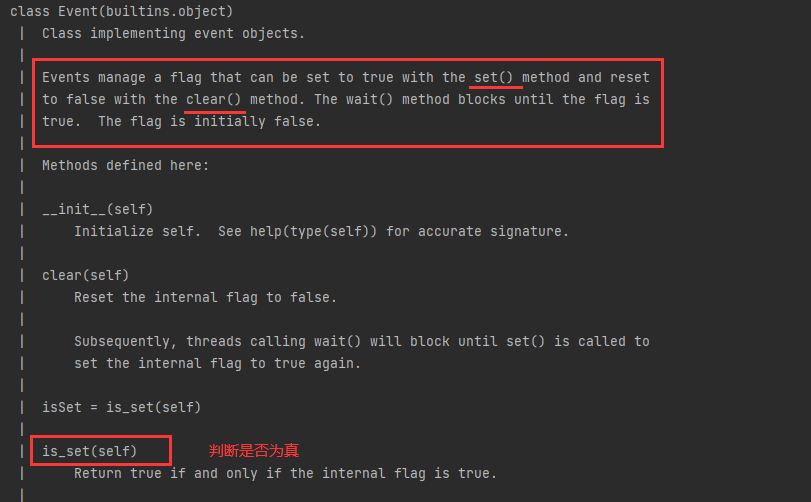
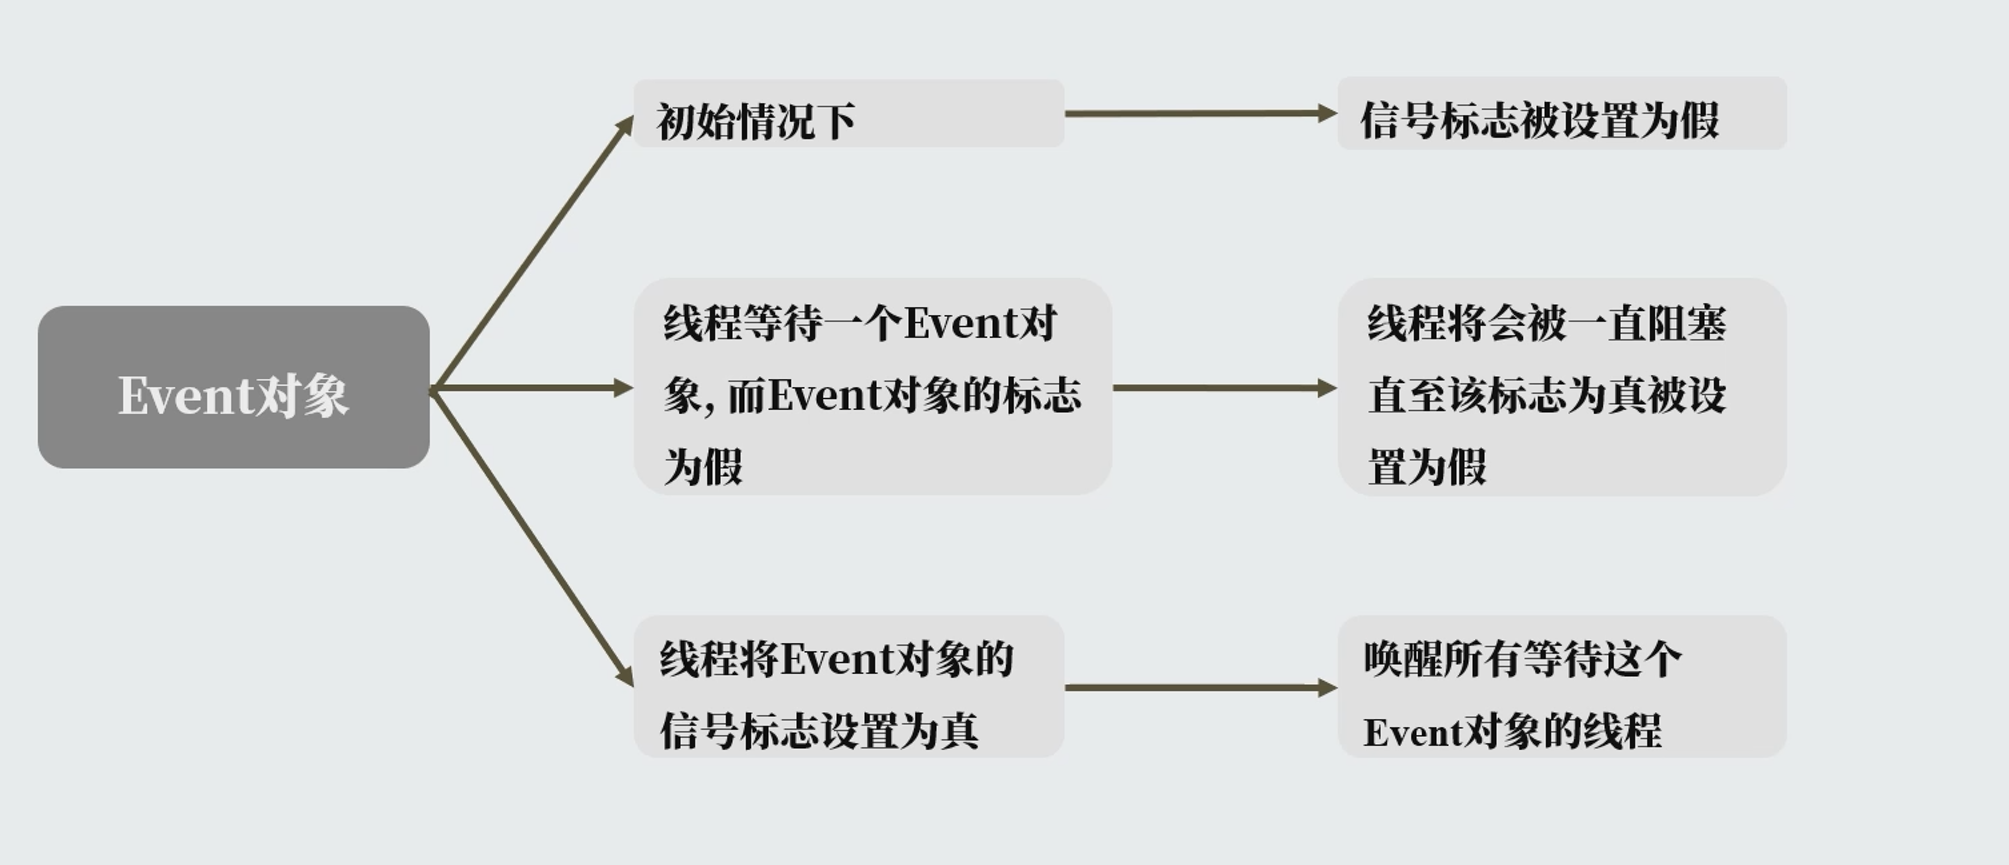
logging.basicConfig(level=logging.DEBUG, format='(%(threadName)-10s) %(message)s',) defworker(event): whilenot event.is_set(): logging.debug('Waiting for redis ready...') event.wait() logging.debug('redis ready, and connect to redis server and do some work [%s]', time.ctime( )) time. sleep(1)
readis_ready = threading.Event() for i inrange(3): t = threading.Thread( target=worker, args=(readis_ready,)) t.start() logging.debug('first of all, check redis server, make sure it is 0K') time. sleep(3) readis_ready.set()
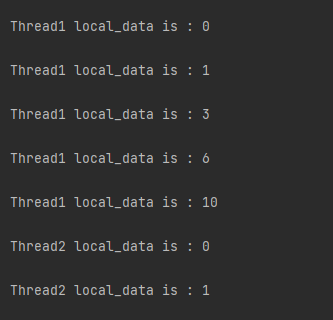
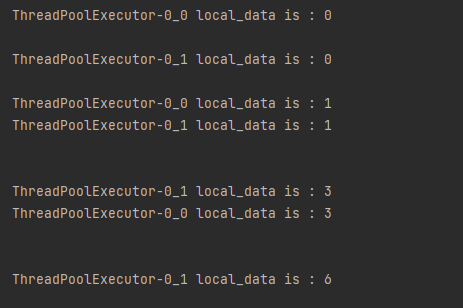
import threading,time from concurrent.futures import ThreadPoolExecutor #创建全局ThreadLocal对象: local_data = threading.local() deffun(n): for i inrange(n): try: local_data.num+= i except: local_data.num = i print('\n%s local_data is : %s' % (threading.current_thread().name, local_data.num)) time.sleep(1) with ThreadPoolExecutor(max_workers=2) as pool: task = pool.map(fun, (5,10)) #提交1个任务
import math from multiprocessing import cpu_count from multiprocessing import Pool
defisPrime(n): # 判断数字是否为素数 # 请在此处添加代码 # # *************begin************# if n <= 1: returnFalse for i inrange(2, int(math.sqrt(n)) + 1): if n % i == 0: returnFalse returnTrue
# **************end*************#
defhowMany(T): # 计算给定区间含有多少个素数 # 请在此处添加代码 # # *************begin************# sum = 0; for i inrange(T[0], T[1] + 1): if isPrime(i): sum += 1 returnsum # **************end*************#
defseparateNum(N, CPU_COUNT): # 对整个数字空间N进行分段CPU_COUNT # 请在此处添加代码 # # *************begin************# list = [[i * (N // CPU_COUNT) + 1, (i + 1) * (N // CPU_COUNT)] for i inrange(0, CPU_COUNT)] list[0][0] = 1 iflist[CPU_COUNT - 1][1] < N: list[CPU_COUNT - 1][1] = N returnlist
# **************end*************# if __name__ == '__main__': N = int(input()) # 多进程 CPU_COUNT = cpu_count() ##CPU内核数 本机为8 pool = Pool(CPU_COUNT) sepList = separateNum(N, CPU_COUNT) result = [] for i inrange(CPU_COUNT): result.append(pool.apply_async(howMany, (sepList[i], ))) pool.close() pool.join() # ans = 0 list = [res.get() for res in result] print(sum(list), end = '')
import threading import math ans = 0 lock = threading.Lock()
defisPrime(n): # 判断数字是否为素数 global ans if n <= 1: returnFalse for i inrange(2, int(math.sqrt(n)) + 1): if n % i == 0: returnFalse returnTrue
defhowMany(T): # 计算给定区间含有多少个素数 sum = 0 for i inrange(T[0], T[1] + 1): if isPrime(i): sum += 1 lock.acquire() try: global ans ans += sum finally: lock.release()
defseprateNum(N, CPU_COUNT): # 对整个数字空间N进行分段CPU_COUNT list = [[i * (N // CPU_COUNT) + 1, (i + 1) * (N // CPU_COUNT)] for i inrange(0, CPU_COUNT)] list[0][0] = 1 iflist[CPU_COUNT - 1][1] < N: list[CPU_COUNT - 1][1] = N returnlist
if __name__ == '__main__': N = int(input()) threadNum = 32 # 请在此处添加代码 # # *************begin************# result = [] seqList = seprateNum(N, threadNum) for i inrange(0,threadNum): result.append(threading.Thread(target=howMany,args=(seqList[i],))) result[i].start() for i inrange(0,threadNum): result[i].join() print(N-1-ans)